| A quick and dirty HOWTO on creating levels for Ogre PCZ scene manager in Blender. | |||
|---|---|---|---|
|
Back to the home page |
|||
|
Copyright (c) 2009 Alexei Kireev, fh.pwd@spamgourmet.com Related files -------------------- | |||
| meshexport.py | Modified file from Blender Ogre mesh exporter, by Michael Reimpell. | ||
| ogreHRdotscene.py | Modified Blender Ogre .scene exporter, by Michael Reimpell. | ||
| scene3.zip | A slightly enhanced version of the Blender scene. | ||
| HR_level_test.zip |
The test project (with Visual C++ 2008 Express solution). Now compiles under Linux too, thanks to merlinblack! (Ask him if it does not :) |
||
| Part 1 Part 2 Part 3 Part 4 Part 5 | The test project binaries (ready to run), multivolume zip archive (sorry, my hoster doesn't allow files > 500K). | ||
|
Creating the level -------------------- |
|||
Create a cube (Space, Add->Mesh->Cube), enter edit mode (Tab), select all vertices, scale by X and Y axes (S, Shift+Z, drag mouse):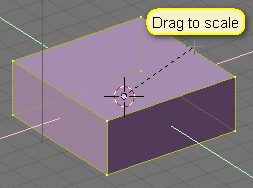 |
|||
|
Press Ctrl+Tab, select Edges from the pop-up menu. Press A to clear selection, then press and hold Shift key and right click two horizontal edges of the box. Create a doorway by using knife tool (Shift+K, use multicut (2), position the new vertices by using G, then X or Y [depending on the wall direction]): 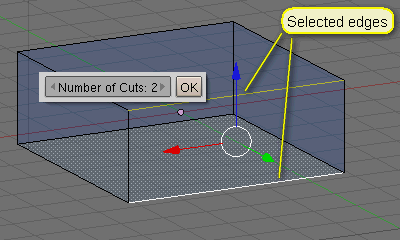 |
|||
|
Go to object mode (Tab), press the Shading button (F5): 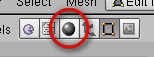 |
|||
|
Under Links and Pipeline/Link to Object press the square button with arrows up and down on the left, select ADD NEW: 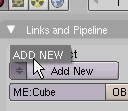
|
|||
|
You have assigned a new material to your object. Go to edit mode (Tab), press Ctrl+Tab, select Faces and select (right-click) your new door face (quad): 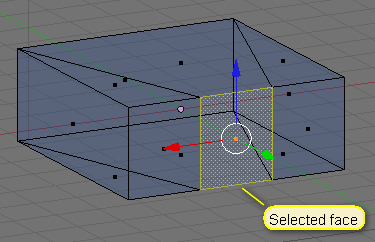
|
|||
|
Press Editing button (F9): |
|||
|
Under Links and Materials press the square button with up and down arrows to the left of Material label, select ADD NEW: 
|
|||
|
You have assigned a new material to the selected face. Click Shading (F5) again, under Links and Pipeline/Link to Object click on the material name (starts with MA:). Type portal, press Enter: 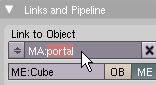
|
|||
|
For easy identification, change the color of this new material by dragging R, G and B sliders on the Material tab, you will see how the face changes color as your drag: 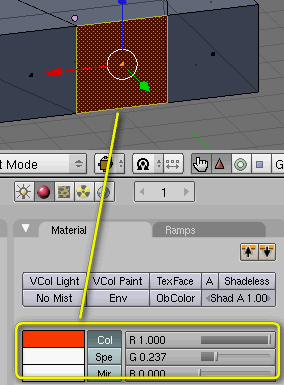
|
|||
|
Now click on Editing button (F9) again and under Mesh Tools More, press Draw Normals button. Also, you may want to increase NSize value, to 0.5 or even more, depending on your mesh size. You can see face normals as light blue lines, theyre pointing outwards:  For an indoor environment you want them pointing inwards. Press A twice to select all the faces of your mesh (if no face was selected before, press A once). Press W and select Flip normals from the pop-up menu.
 |
|||
|
Repeat the procedure to create another cube with its portal in the same position as the first ones (or simply duplicate the first cube and adjust it to fit, or use mirror modifier). The portal faces must be precisely aligned: 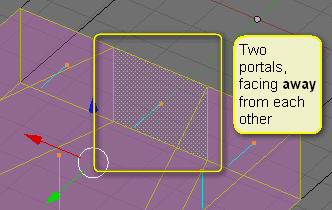
|
|||
|
Export the created meshes, using the modified mesh exporter script (which doesn't export portal faces). Convert the .mesh.xml files to .mesh files, using Ogre mesh converter (OgreXMLConverter.exe). Export the scene, using the modified scene exporter script. |
|||
|
Loading the exported scene -------------------- | |||
|
Use the provided project to see how its done. For details on how to build the project with compilers other then Visual C++ 2008, see the readme file. Portions of this work provided by OgreMax (www.ogremax.com) |
|||